
Essential Oil Blending for Beginners
As you would expect best aromatherapists have a great nose for aromas, but so can you when it comes to creating your own diffuser blends. I would like to introduce you to my simple method of “Personal Blending”. Even though creating blends for therapeutic use is a highly complex and scientific task, it’s possible for you to do it in a way that you will enjoy.
My Blending Approach
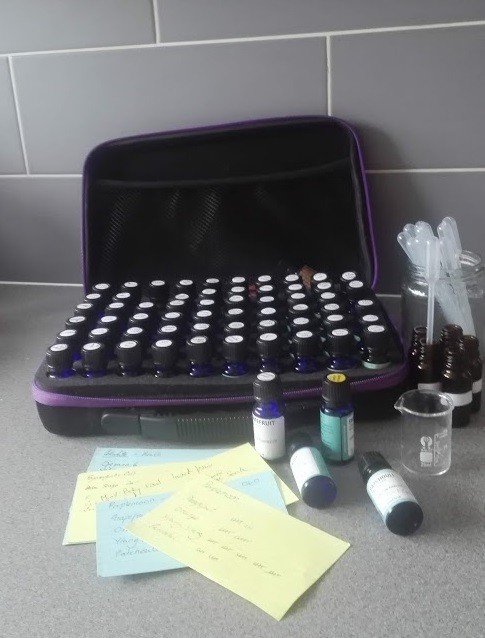
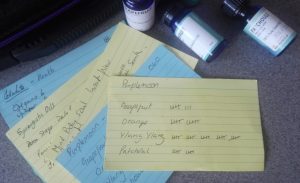
What you will need is much the same as what I use when I have a blending session (see image above). During the process, I record my blending on an index card. I start with a yellow index card. I don’t always finish a blend in the first sitting as some blends change over time. depending on the oils. In these cases I might start a blend, let it sit for a few days or a week and then come back to it a little later and re-continue. When I am happy with the blend I transfer the final recipe details onto a final blend, blue card. I also add the recipe details to my electronic register of blends. It is not unusual to find similar blends to mine on the internet, but with different amounts or with one or two different oils, especially when it comes to topical application blend. The reason for this is because some oils are known to benefit certain issues Eg. Sweet orange is a common oil in many essential oils design to ‘uplift’ your mood.
The hardest thing for me is naming blends, so sometimes I just give them a number. If you ever want to name a blend for me, just let me know.
The method I will show you below consists of three parts, so you can create the experience you want.
Personal Blending – 3 Options
The practical – JUST DO IT. Some people simply pick up oils they are curious about add drop by drop and decide whether or not they like it. It’s OK to do that, but we’ve found that if you blend something you like without recording it. If you find you like it, it’s almost impossible to remember, let alone repeat.
The System – This comprises of two parts, visualizing the mood and selecting the oils.
The Theoretical – If you want to add a little more knowledge to your approach, then you can research the notes of each of the oils before you start blending. That’s not to say you can’t research the oils afterwards.
Creating blends using the ‘personal’ blend method, uses your sense of smell and is simple, so let’s get started.
Preparation
What you will need.
- Your essential oils (if you want to be super-efficient, research the different notes e.g. top, middle and base and group them accordingly, but you will have to keep this grouping throughout).
- A clean empty 5-10ml dark glass bottle, (amber, brown or green will do)
- Pen and paper
- A self-adhesive label to fit your bottle to label your blend.
Process
- With everything in front of you, sit for a moment and think about the mood you want to create (in your own words, e.g. calm, confident, relaxed, energised, grounded.)
- Let’s say you fancy an aroma that will uplift your spirits when you come home after a long day. Imagine how your body would feel when it has been uplifted.
- Now with that mood in mind, take a whiff of each of your essential oils. Put to one side the oils that best capture the mood or feeling you want to achieve. (Keep the grouping of notes throughout, if you start this way). If you have lots of oils, don’t smell them all at the same time. You can perhaps choose your favourites or take a half-hour break to clear your head after smelling about 5 oils or it may begin to get confusing or a bit ‘heady’
- Repeat that process until you whittle your selection down to 3 oils, to keep the process simple. We will call these oils 1, 2 and 3.
- Put a drop of oil 1 into the empty bottle, (for each drop you put in the bottle, make a note/mark on your card), add one drop of the second oil. Put the cap on the bottle and just roll the bottle between the palms for a few seconds (to warm the oils and help them to mix). Next, smell the oil by moving it backward and forward under your nose, rather than giving it one big sniff.
Note: Your blend will probably have oils with more than one ‘note’. The note e.g. top, middle or base, tells you how quickly that oil will evaporate. When you take one big whiff from a bottle, you usually get the top notes first, middle notes next, then finally the base notes. This will not be the aroma of the blend when finally diffused. That is why I say wave the bottle back and forth under your nose, this method will give you a better idea of the eventual aroma.
- The next step is to add one drop of the third oil, warm to blend then smell. Repeat the process adding more of a particular oil, recording it on your paper then savour the aroma until you achieve the aroma you want.
- When you have the aroma you want, label it. Finally, turn the paper (or index card) over and write down the final recipe then date the card. Use your blend over the next week. After that time return to the card and add any further notes on how the blend worked for you.
That’s it!
This is a great way of getting to know the oils without getting scientific or having to train as an aromatherapist, you will develop a great nose for the oils and find what works for you.
Because not all oils are created equally, make sure you always source your oils from a reputable and trusted source like Naturra.
If you develop a great aroma why not share your experience with other essential oils enthusiasts by leaving a comment on this post.
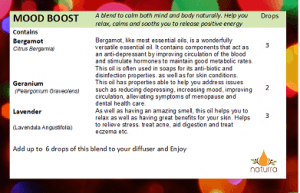
You will find in our post a very simple recipe for MOODBOOST. A blend to calm both mind and body naturally.